❯❯ mederu.art/create
ATELIER MANUAL
Detailed studio-by-studio reference for every creative tool in the mederu Atelier.
▸ ATELIER ARCHITECTURE
The internal structure of atelier mederu
🖌️
DRAW
PAINT / COLLAGE / GEN / PIX
↓
🖌️ PAINT
🖼 COLLAGE
🎞 GIF
✨ GEN
🟩 PIX
📚 LIB
🤖 AI
🔮
me:DERU EFX
DERU / MEDE
↓
🐵 DERU
🔮 MEDE
🌊 LFO
📤
POST / MINT
Publish on-chain
↓
📤 POST
📁 COLLECTIONS
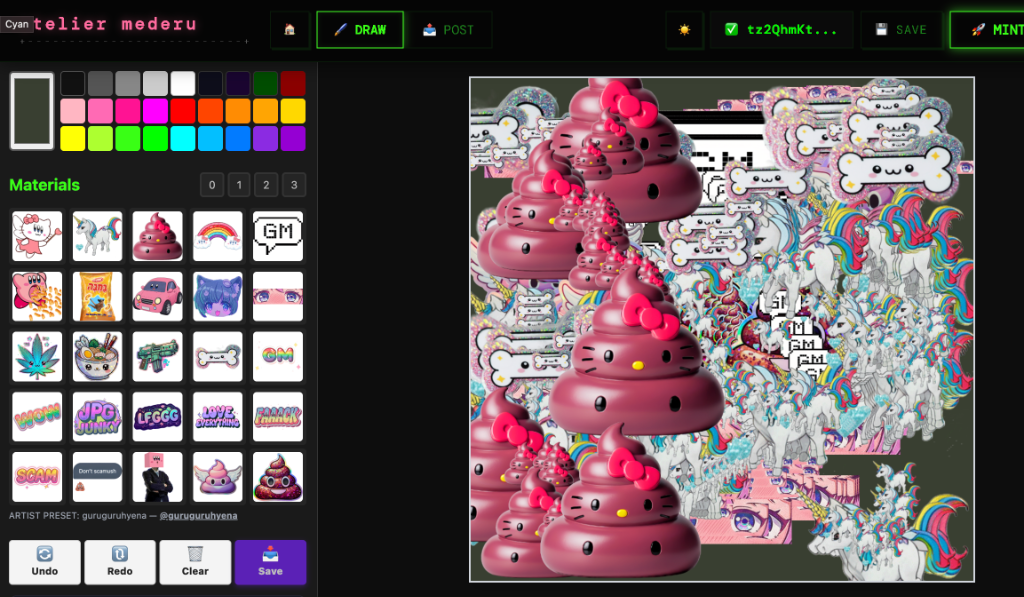
🖌️
PAINT STUDIO
▼Full-featured digital painting canvas
🎫 Artist Pass required
🎨
Multi-layer Canvas
Paint on multiple independent layers with full opacity control. Reorder, duplicate, merge, hide, or lock layers to build complex compositions. Compact 1-row layout: 🐵/🙈 visibility toggle, opacity slider, blend mode, and reorder — all inline.
🖌
Brush Engine
Adjustable brush size (N/M keys), color, and dynamic size toggle. SIZE / COL / DYN controls displayed in a single compact row with labels above.
🎭
Blend Modes
Each layer supports blend modes: Normal, Multiply, Screen, Overlay, Darken, Lighten, and more. Layer effects are composited in real-time on the canvas.
🔧
Tools
• Brush — freehand painting
• Eraser — erase with adjustable size
• Fill — bucket fill a region
• Eyedropper — pick color from canvas
• Move — reposition the current layer
• Undo / Redo — full history stack
📐
Canvas Options
Start with a blank canvas or import an image. Resize, flip horizontal/vertical, and rotate 90°. Dark or light canvas background toggle. All sections are collapsible — click headers to organize your workspace.
🔍
Canvas Zoom & Pan
←/→ arrow keys to zoom in/out (when no element selected). Ctrl+scroll wheel to zoom. Space+drag to pan around the canvas. Double-click to reset zoom to 100%.
🎨
Material Presets
Load pre-made texture and pattern presets from community artists. Drag & drop to reorder slots. Using a preset automatically credits the original artist in your NFT metadata (8% total royalty share, split evenly among all material artists used).
✲
Symmetry / Kaleidoscope
7 symmetry options in one row: OFF / 2 / 4 / 6 / 8 / 10 / 12-fold. Creates mandala-like kaleidoscope patterns as you paint. Effect is per-layer. Symmetry controls hide together with Brush Settings when collapsed.
⌨ KEYBOARD SHORTCUTSFull list →
BBrush tool
EEraser tool
GFill tool
IEyedropper
N / MBrush size smaller / larger
SSave (download) + Snapshot (library)
⌘/Ctrl + ZUndo
⌘/Ctrl + Shift + ZRedo
← / →Canvas zoom out / in (no selection)
Ctrl + ScrollCanvas zoom at cursor
Space + DragPan canvas
💡 TIPS
💡 Start on a new layer for each major element — this lets you adjust composition later.
💡 Use Multiply blend mode on a layer to add shadows without losing underlying detail.
💡 Material presets from other artists are credited automatically — great for collaborations.
💡 Collapse unused sections (Mode, Layers, Brush, etc.) to focus on your work.
💡 Use ←/→ keys to zoom into details, Space+drag to pan, double-click to reset.
💡 Press 📤 POST to capture your canvas and go directly to POST mode for minting.
💡 Switching to DERU or MEDE auto-snapshots your canvas — your drawing is carried over as a layer.
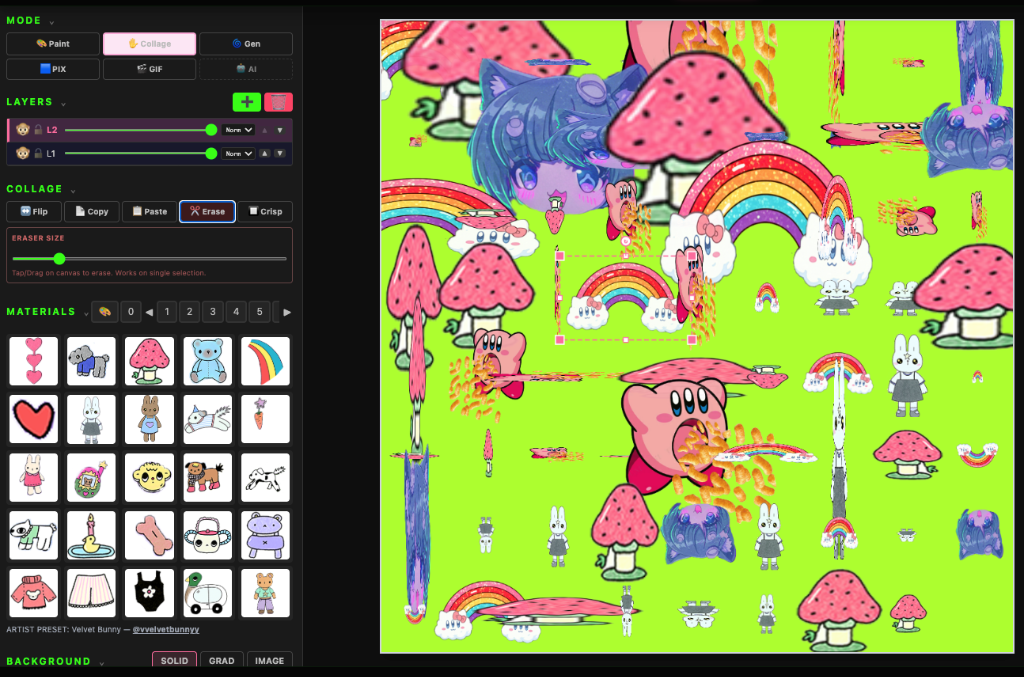
🖼
COLLAGE STUDIO
▼Mixed-media image composition — World Collage Day Edition
🎫 Artist Pass required
🆕 Enhanced for World Collage Day (May 9). The Collage Studio now supports direct drag & drop image import, AI-powered background removal, area selection with cut/copy, per-element opacity and blend mode controls, and the ability to save collage assets to your palette for reuse.
📥
Drag & Drop Import
🆕 Drag image files directly onto the canvas to import them as collage elements. Multiple images can be dropped simultaneously — each is staggered automatically. The element is placed exactly where you drop it and auto-selected for immediate manipulation.
📸
Image Import
Import photos, illustrations, or textures from your device via the material palette. Multiple images can be loaded simultaneously as separate layers.
🪄
AI Background Removal
🆕 Select any image element and click 🪄 BG Rem to automatically remove its background using AI (DeepLab). The segmentation model runs client-side — no uploads required. First use loads ~8MB model (cached after).
📐
Area Select & Cut/Copy/Erase
🆕 Click 📐 Area to activate area selection mode. Draw a rectangle on the canvas with marching-ant preview. Then:
• 📋 Copy — duplicate the region as a new element (original stays)
• ✂️ Cut — extract region as new element + remove originals
• 🗑 Erase — remove elements in the area (no copy)
↔️
Transform
Resize, rotate, and reposition each imported image freely. Corner drag: uniform scale. Edge drag: stretch. ⌘+corner: free aspect. ⌥+corner: skew/shear.
↕️
Vertical Flip
🆕 Flip selected elements vertically (↕️ VFlip button). Combined with the existing horizontal flip (↔️ Flip), you can mirror collage elements in any direction.
🎚️
Element Opacity & Blend
🆕 Per-element opacity slider (0–100%) and blend mode selector. Available blend modes: Normal, Multiply, Screen, Overlay, Color Dodge, Color Burn, Hard Light, Soft Light, Difference, Exclusion, Luminosity.
📌
Save to Palette
🆕 Select a collage element and click 📌 Save to store it in your personal palette. The element (including any eraser cuts) is saved to the first available slot for reuse across sessions.
📐
Layer Composition
Stack and blend imported images with drawn elements. All layers from Draw mode are available — combine painting with photography.
🔲
Crisp Mode
Toggle pixel-perfect edges for collage items — eliminates anti-aliasing for sharp, clean compositing.
✂️
Crop & Ratio
Set crop ratio to Free, 1:1, 4:3, 3:2, or 16:9. Export only the visible composition.
💡 TIPS
💡 Combine Collage with Draw mode — import a photo as a base layer, then paint on top.
💡 Use different blend modes on imported images for creative double-exposure effects.
💡 🆕 Drop multiple images at once to quickly build a layered collage composition.
💡 🆕 Use AI background removal to isolate subjects from photos — great for photo montages.
💡 🆕 Area Cut is perfect for extracting parts of painted layers and repositioning them.
💡 🆕 Lower element opacity to create translucent overlays — combine with Multiply blend for watermark effects.
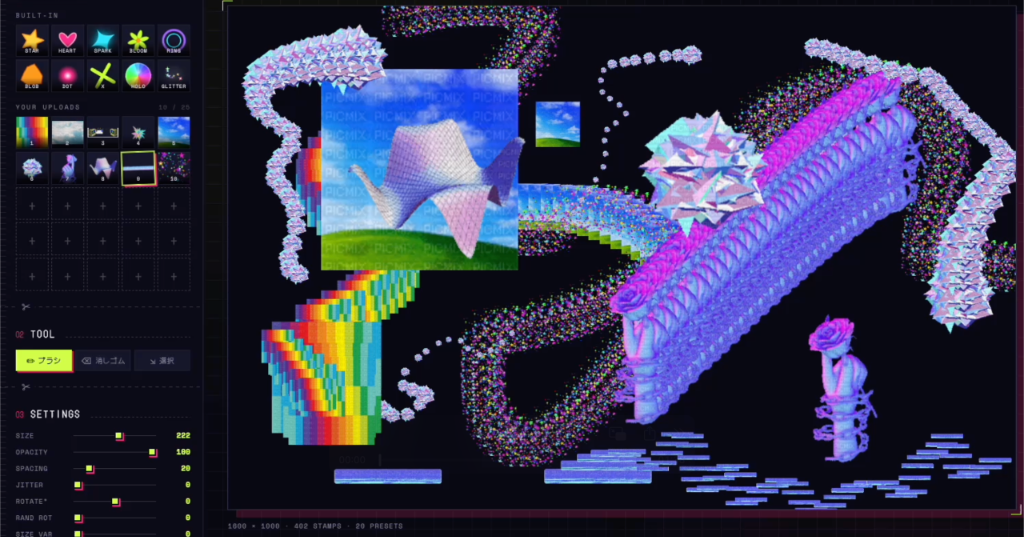
🎞
GIF COLLAGE
▼Animated collage creation — DRAW + DERU workflow
🎫 Artist Pass required
Create animated GIF collages by combining the Collage Studio's composition tools with DERU's frame-based animation system. Build each frame as a collage composition, then assemble them into an animated GIF or MP4 in DERU.
🔄
Workflow Overview
The GIF Collage workflow uses two studios in sequence:
1️⃣ DRAW (Collage mode) — Compose each frame as a collage
2️⃣ DERU — Assemble frames into animation
Each time you press S (Save/Snapshot) in DRAW, your canvas is saved to the Library. When you switch to DERU, all snapshots appear as layers — ready for GIF/MP4 export.
📥
Step 1: Import Images
In DRAW → Collage mode, drag & drop images directly onto the canvas. Each image becomes a movable, scalable, rotatable element. You can import multiple images at once — they are staggered automatically.
Supported formats: PNG, JPG, WebP, GIF (first frame), SVG. Images from the Material palette and Library also work.
🎨
Step 2: Compose Your Frame
Use the full Collage toolkit to build each frame of your animation:
• 🪄 AI Background Removal — isolate subjects from photos
• ↔️↕️ Transform & Flip — resize, rotate, mirror elements
• 🎚️ Opacity & Blend — per-element transparency and blend modes (Multiply, Screen, Overlay, etc.)
• ✂️ Area Select — Cut, Copy, or Erase rectangular regions
• 📌 Save to Palette — store elements for reuse across frames
• 🔲 Crisp Mode — pixel-perfect edges without anti-aliasing
📸
Step 3: Capture Frames
Press S to snapshot your current composition. This saves it to the Library.
Repeat the compose → snapshot cycle for each frame of your animation:
1. Arrange elements for Frame 1 → press S
2. Move/adjust elements for Frame 2 → press S
3. Continue until all frames are captured
💡 Small changes between frames create smooth animation. Large changes create stop-motion effects.
🐵
Step 4: Animate in DERU
Switch to DERU tab. Your snapshots automatically appear as layers (frames).
• Reorder frames by dragging layers up/down
• Adjust per-frame delay for timing control
• Use the global Speed slider to set overall animation tempo
• Preview your animation in real-time before export
• 🆕 GIF Speed Sync ensures preview speed matches export speed exactly
🔮
Step 5: Add Effects (Optional)
Each DERU layer can have its own EFX stack. Apply effects per-frame or globally:
• Color adjustments (hue shift, posterize, duotone)
• Distortion (glitch, melt, pixel sort)
• Style filters (halftone, dither, ASCII art)
• LFO modulation for parameter animation across frames
📤
Step 6: Export
From DERU, export your animation as:
• 🎞 GIF — universal animated image format
• 🎬 MP4 — higher quality video (via WebCodecs)
Or press S to send the result to POST for direct on-chain minting as an animated NFT.
🪄
Masking for Animation
Use masking techniques to create complex animated compositions:
• 🪄 AI BG Removal — remove backgrounds from photo elements, then animate the isolated subject moving across different backgrounds
• ✂️ Area Cut — extract parts of a collage and reposition them frame-by-frame
• 🎚️ Opacity Animation — manually change element opacity across frames for fade-in/out effects
• Blend Mode Shifts — switch blend modes between frames for dramatic transitions
💡 TIPS
💡 Start with a static background layer, then animate only the foreground elements for clean results.
💡 Use 🪄 BG Removal on photo subjects, then place them on painted backgrounds for mixed-media animation.
💡 Capture 4–8 frames for a simple loop, 12–24 frames for smooth animation.
💡 Lower the opacity of the previous frame's snapshot (via Library preview) as an onion-skin reference for the next frame.
💡 In DERU, use the Speed slider to quickly test different animation speeds before exporting.
💡 Combine with MEDE node editor for advanced effects: apply different glitch intensities per frame, or use LFO modulation for parameter sweeps.
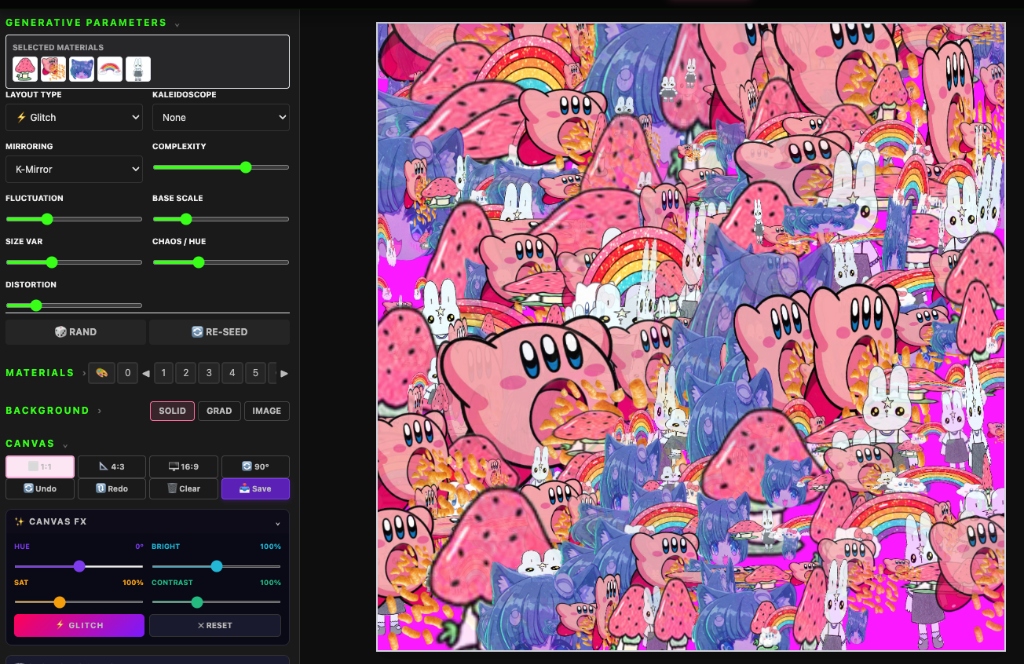
✨
GENERATIVE STUDIO
▼Algorithmic pattern generation
🎫 Artist Pass required
🔢
Algorithm Selection
Choose from built-in generative algorithms: noise fields, flow patterns, particle systems, fractal structures, and parametric designs.
🎛
Parameter Controls
Adjust seed values, iteration count, color palettes, density, and complexity. Each parameter change generates a unique output.
🎲
Randomize
Click the randomize button to generate new variations with different seed values. Each result is mathematically unique.
📐
Resolution
Generate at canvas resolution. High-resolution output for detailed prints and large-format display.
🖌
Paint + Generate
Generative output is rendered onto the canvas as a layer. You can paint over it, mask areas, or combine with other layers.
💡 TIPS
💡 Generate on one layer, then draw on another layer above to create human + machine artwork.
💡 Use Overlay blend mode on a generative layer to apply patterns to existing paintings.
🟩
PIX STUDIO
▼On-chain pixel art editor
🎫 Artist Pass required
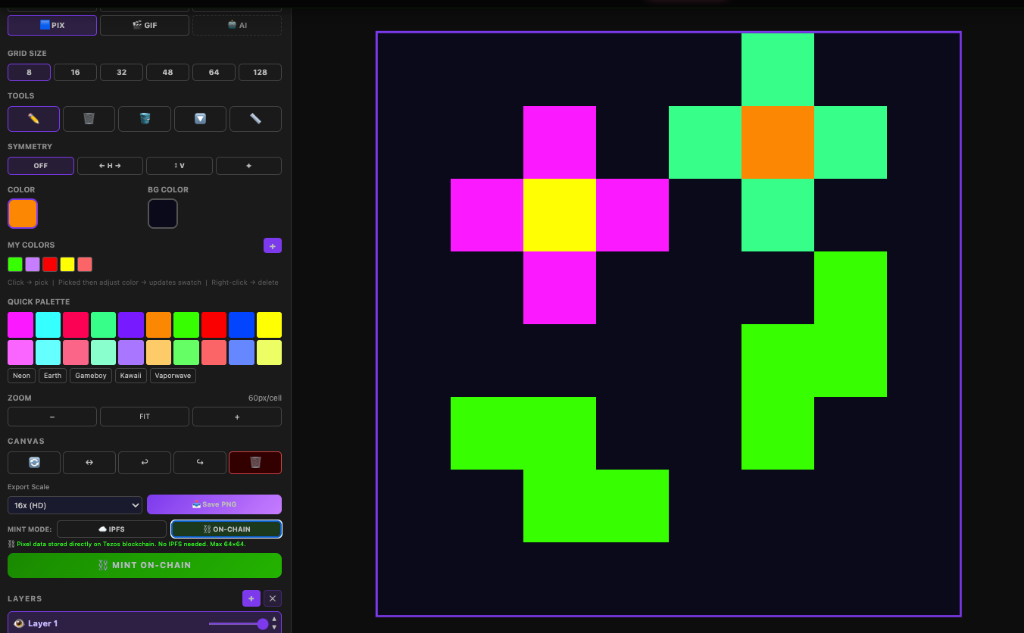
⬛
Pixel Canvas
Dedicated pixel art editor with grid sizes from 8×8 to 128×128. Crisp, aliased rendering — no anti-aliasing, no blur.
📚
8-Layer System
Up to 8 independent layers with visibility toggles and lock. Each layer has its own opacity and can be composited in any order.
🎨
Color Palette
Custom palette editor with up to 32 swatches. Import palettes or create your own. Eyedropper to pick colors from the canvas.
🖌
Drawing Tools
• Click to draw with selected color
• Shift + Click to erase
• Fill tool for flood fill
• Eyedropper to sample colors
⛓️
On-Chain Minting
PIX art is minted 100% on-chain as a data URI embedded in the token metadata. No IPFS dependency — your art lives on the Tezos blockchain forever.
📏
Export Size
PIX art is exported at a minimum of 512×512 pixels for visibility. The pixel-perfect upscaling maintains crisp edges with image-rendering: pixelated.
⌨ KEYBOARD SHORTCUTSFull list →
ClickDraw with selected color
Shift + ClickErase pixel
💡 TIPS
💡 Start with a small canvas (16×16 or 32×32) for iconic pixel art.
💡 Use layers to separate the character, background, and effects — easier to iterate.
💡 PIX art is fully on-chain — no IPFS, no CDN dependency. It will exist as long as Tezos exists.
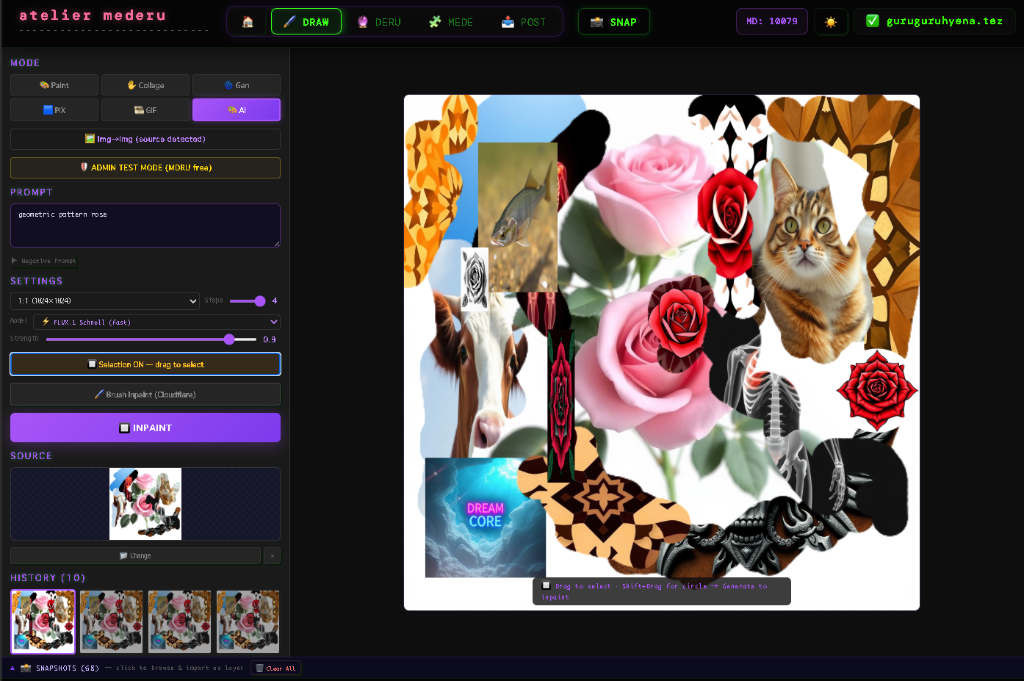
🤖
AI STUDIO
▼AI-powered image generation — text-to-image, image-to-image, and inpainting
🎫 Artist Pass required · $MDRU powered
AI Studio brings AI image generation directly into the atelier. Generate images from text prompts, transform existing images, or inpaint specific regions. All generation costs $MDRU tokens. Generated images are auto-saved to your Library for use across all studios.
📝
Text-to-Image (t2i)
Enter a text prompt and generate an image from scratch. Supports multiple AI models and aspect ratios. Results appear on the main canvas and are saved to your Library automatically.
🖼
Image-to-Image (i2i)
Transform an existing image using a text prompt. Drag & drop or select a source image, enter your modification prompt, and adjust the Strength slider to control how much the AI changes the original.
🎭
Inpaint Mode
Paint a mask over specific regions of an image, then generate AI content only in the masked area. Use Brush Paint for freehand masking or selection tools for geometric shapes.
🤖
Model Selection
11 AI models available:
• ⚡ FLUX Schnell — fast, low cost (default)
• 🎨 FLUX Dev — higher quality
• 🌸 Flux Schnell — Pollinations free tier
• 🤖 GPT Image / GPT Image 1.5
• 🔗 Kontext · ⚡ Klein 4B · 🔍 Z-Image 2x
• 🎭 Wan 2.7 · ✨ Qwen · 🖼️ Nova Canvas
📐
Size Presets
5 aspect ratio presets: 1:1 (1024×1024), 4:3 (1024×768), 3:4 (768×1024), 16:9 (1280×720), 9:16 (720×1280).
📚
History & Library
All generated images are stored in a scrollable history panel. Click any history item to view it. Generated images are automatically saved to the Library for use in DRAW, DERU, and MEDE.
🔗
Cross-Studio Integration
Send generated images to:
• 🖌 DRAW — as a new canvas layer
• 📤 POST — directly to minting
• 🖼 Source — as AI Studio source for further editing
💰
MDRU Cost
Each generation costs 10 $MDRU. Check your balance in the top bar.
🧩
MEDE AI Node
AI generation is also available as a 🤖 AI node in the MEDE node editor. Connect it to EFX nodes for AI-powered creative pipelines. Prompt, model, and size are configurable per node. Generated images auto-save to Library.
💡 TIPS
💡 Start with FLUX Schnell for quick iterations — it's the cheapest model.
💡 Use i2i mode with low strength (0.2–0.3) for subtle edits to existing artwork.
💡 Inpaint mode is great for fixing specific areas without affecting the rest.
💡 In MEDE, connect an AI node → EFX node chain to auto-apply effects to generated images.
💡 All generated images auto-save to Library — drag them into DERU for GIF animation frames.
📚
LIBRARY & SNAPSHOTS
▼Central asset management — the bridge between all studios
🎫 Artist Pass required
The Library is the central hub connecting all studios. Every snapshot, import, and generated image flows through the Library. It serves as the bridge between DRAW, DERU, MEDE, and POST — enabling seamless cross-mode workflows.
📸
Snapshots
Press S in DRAW mode to capture your canvas as a snapshot. Snapshots are saved to the Library with full resolution and metadata (material attributions, layer info). Each snapshot becomes available in DERU and MEDE as a source image.
🔄
Auto-Snapshot on Mode Switch
🆕 Switching from DRAW to DERU or MEDE automatically captures your canvas and adds it as a library entry + DERU layer. No manual snapshot needed — your work flows seamlessly between modes.
📥
Drag & Drop Import
Drag image/video/GIF files from your desktop directly into the Library panel. Files are automatically imported with thumbnail generation. In DERU, dropped images are added as both library entries AND layers simultaneously.
🎞
GIF & Video Support
🆕 The Library supports animated media:
• 🎞 GIF — imported with animated preview, first frame as thumbnail
• 🎬 MP4/WebM — imported with first-frame thumbnail extraction
Visual badges (🎞 GIF / 🎬 MP4) appear on library thumbnails for easy identification.
🔀
LayeredVision AI Split
🆕 Select any library image and click 🔀 Layered to AI-split it into 2–10 transparent PNG layers (powered by ModelScope Qwen). Layers are added to DERU or DRAW in correct BG→FG order. See the LayeredVision section for full details.
🖼
Source for All Studios
Library images serve as:
• DERU — layers for GIF/animation
• MEDE — Source node inputs
• POST — artwork for minting
The Library persists across mode switches, ensuring your assets are always available.
💡 TIPS
💡 Capture multiple snapshots in DRAW (one per animation frame), then switch to DERU — all frames become layers instantly.
💡 Drag & drop directly onto the DERU panel for instant library + layer creation.
💡 Use 🔀 LayeredVision to break complex images into separate layers for targeted effects.
🔀
LayeredVision AI
▼AI-powered automatic image layer splitting
🎫 Artist Pass required
🆕 LayeredVision uses AI (ModelScope Qwen-Image-Layered) to automatically split a single image into multiple transparent PNG layers — separating foreground subjects from backgrounds. The resulting layers can be sent to DRAW (as paint layers) or DERU (as EFX layers).

🧠
AI Layer Splitting
Upload any image and the AI analyzes its composition, splitting it into 2–10 transparent layers. Each layer isolates a visual element (background, midground, foreground subjects, etc.).
⚙️
Parameters
• Layers (2–10) — number of layers to generate
• Steps (10–25) — AI processing steps (higher = more detail)
• Guidance (1–10) — how strictly the AI follows the splitting prompt
• Prompt — optional text to guide the splitting
📍
Access Points
LayeredVision is available from two places:
• DRAW Snapshot Modal → 🔀 Layered → sends layers to Paint Canvas
• DERU Library Modal → 🔀 Layered → sends layers to DERU layer stack
📦
Output
• Preview grid with BG/FG labels for each layer
• Individual layer selection toggles
• ZIP download of selected layers (01_BG.png, 02_FG.png, ...)
• Direct send to DRAW or DERU
⚡
Rate Limits
4 requests per minute, 20 per hour (per IP). The AI model runs server-side — no GPU required on your device.
💡 TIPS
💡 Use 2–3 layers for simple subject/background separation. Use 5+ layers for complex scenes.
💡 Split a photo into layers, then apply different MEDE effects to each layer for creative compositing.
💡 Higher Steps (20+) give cleaner edges but take longer to process.
🔮
me:DERU EFX
▼Image + Effect layer/node system — the creative effects engine
🎫 Artist Pass required
me:DERU efx is the creative effects engine of atelier mederu. It consists of two apps — DERU (layer-based) and MEDE (node editor) — plus the LFO modulation system for parameter animation. Your artwork flows: DRAW ──📸──→ DERU / MEDE ──EFX──→ POST ─→ MINT.
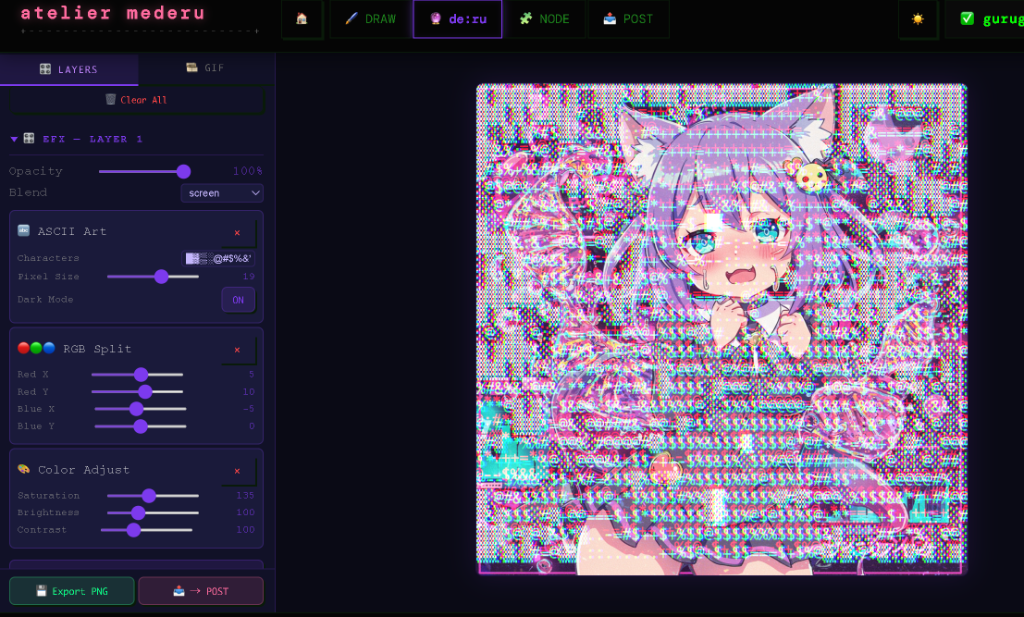
🐵
DERU — Layer EFX / GIF Studio
Compose worlds with image + effect layers. Manage and process snapshots taken in DRAW mode. Reorder frames, stack multiple effects, and generate GIF / animations. Each layer holds an image and an EFX stack.
🆕 Auto Layer: Switching from DRAW to DERU automatically snapshots your canvas and adds it as a layer. Drag & drop images onto DERU to add them as both library entries AND layers simultaneously.
🆕 GIF Speed Sync: Adjusting the global speed slider now instantly updates all frame delays — export speed matches preview speed exactly.
🔮
MEDE — Node Editor
A node-based visual programming editor for image processing. Connect Source nodes → EFX nodes → Blend nodes → Output. Each node shows a live preview. Press E to execute the pipeline. Material trait data from DRAW carries over automatically.
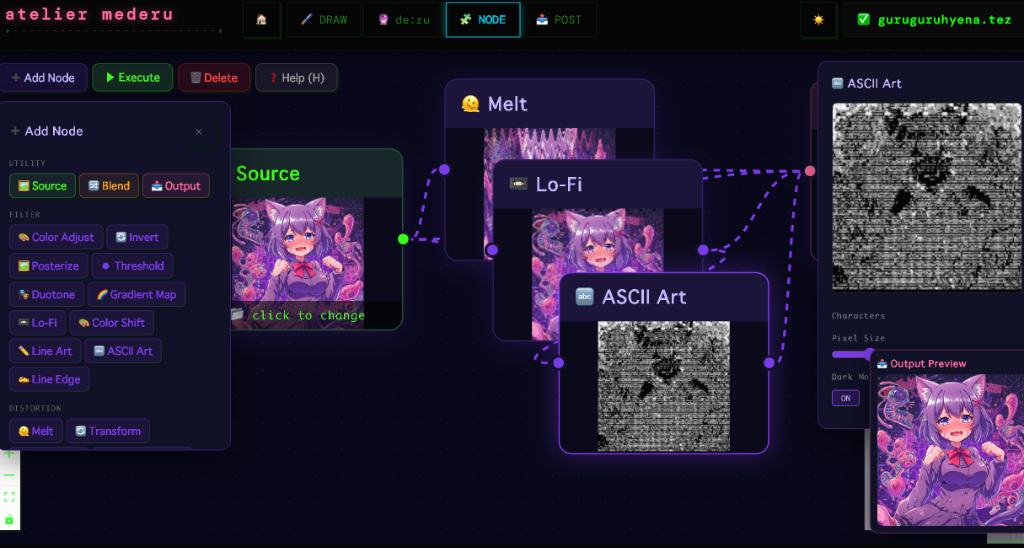
🔗
Node Types
🖼 Source — Image input (library / file / drag & drop)
🔮 EFX — Effect processing nodes
🎲 Blend — Merge two inputs (blend modes + opacity)
🎭 Mask Draw — Paint a mask to selectively apply effects (with feathering)
✂️ Split Compose — Dual-image split with 9 patterns (incl. 🎭 Custom Mask)
🌊 LFO — Low-frequency oscillator for parameter animation
📤 Output — Final preview & export
✂️
Split Compose — Custom Mask
The Split Compose node now supports a 🎭 Custom Mask pattern (pattern #9). Select it from the pattern dropdown, then click the preview to open the Mask Editor. Draw/erase the mask, or use Color Select with tolerance to pick color ranges. White = image B, Black = image A. Swap A/B to invert.
🌊
LFO Modulation
🆕 Low-Frequency Oscillator nodes animate EFX parameters over time. Connect an LFO node (cyan) to any EFX parameter port to modulate it automatically.
• 7 Wave Shapes: Sine, Triangle, Sawtooth, Square, Random, Noise, Step
• Rate Modes: Free (Hz) or BPM Sync (auto-detect from audio or manual input)
• BPM Divisions: 1/16, 1/8, 1/4, 1/2, 1bar, 2bars, 4bars
• Phase Offset: 0–360°
• Step Sequencer: 8 or 16 steps for rhythmic patterns
• ADSR Envelope: Attack, Decay, Sustain, Release for shaped modulation
LFO edges appear as cyan dashed lines (vs purple solid for normal connections). Zero performance overhead — pure math computation.
🎨
Color Effects
Color Adjust · Threshold · Color Shift · Invert · Duotone · Posterize · Gradient Map · Lo-Fi · Line Art
✦
Style Effects
ASCII Art · Kanji Art · Dither · Line Edge · Halftone — transform images into typographic, halftone and dot-matrix art styles. Halftone supports Mono, Color-preserve, and CMYK print modes with circle/square/diamond dot shapes.
🌀
Distortion Effects
Melt · RGB Split · Portrait Distort · Horizontal Distort · Transform · Slit Scan · Fragment Glitch · RGB Glitch · Feedback · Noise
📝
Overlay Effects
Text Overlay · Text Frame — add typographic elements to compositions.
🔒
State Persistence
🆕 DERU and MEDE components are always-mounted — switching between DRAW, DERU, MEDE, and POST preserves all state (layers, EFX chains, node graphs, LFO configs). No work is ever lost when switching modes.
🔌
MOD System (coming soon)
All effects use the MOD format. MODs are created by code specialists and can be shared across the community, enabling infinite creative possibilities.
🔌 MOD CATALOG (All Effects)
▶🎨 Color / Filter7 MODs
▶🌀 Distortion9 MODs
▶📻 Lo-Fi / Noise2 MODs
▶✦ Style / Typography5 MODs
▶📝 Overlay3 MODs
▶🔧 nathan MODs3 MODs
▶🧪 Giu_NFT MODs12 MODs
⌨ KEYBOARD SHORTCUTSFull list →
E / EnterExecute pipeline
SExport → POST
DDisconnect wire
HHelp
AAdd node
LLibrary
BackspaceRemove selected node
Z / XUndo / Redo
N / MMask Editor: brush size smaller / larger
Shift/Opt + DragBox selection (multi-select nodes)
💡 TIPS
💡 Start with one Source node and connect it to multiple effects to compare results side-by-side.
💡 Chain effects continuously: connect the output of one effect into another. Effects accumulate infinitely!
💡 Drag & Drop any image file directly from your computer onto a Source Node or the Library to load it instantly.
💡 Did you know? Even deeply nested masked effects will properly retain all preceding effects in the chain!
💡 Reconnecting or removing edges automatically re-executes the pipeline — no need to press E every time!
💡 Use Mask Draw nodes to apply effects only to specific regions. The feathering slider creates smooth mask boundaries.
💡 Alt (Option) + Drag on the canvas to box-select multiple nodes at once. Shift + Click to add to the selection.
📤
POST STUDIO
▼Mint your artwork onto Tezos
🎫 Artist Pass required
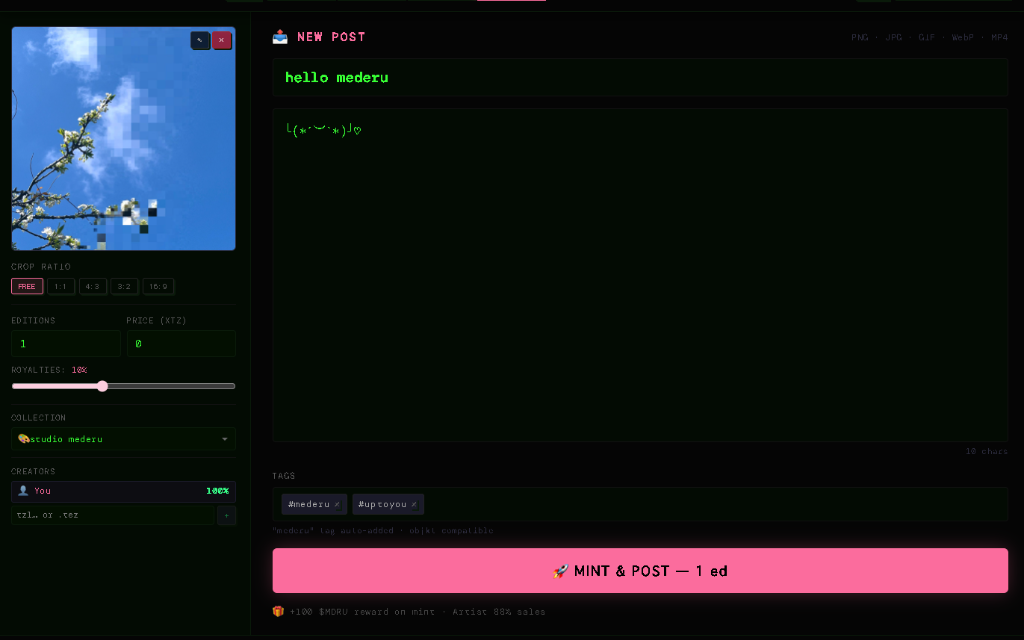
📝
Metadata
Set title, description, and tags for your artwork. Tags are used for discovery — "mederu" is auto-added to all mints.
🔢
Editions
Set the number of editions (1 for unique, up to 10000). Each edition is a separate token on the same FA2 contract.
💰
Price & Listing
Set an initial price in XTZ. The artwork is automatically listed on the Objkt marketplace after minting.
👑
Royalties
Set creator royalties from 0% to 25%. Royalties are enforced by the smart contract on every secondary sale — forever.
📁
Collection
Choose which collection to mint into: 🎨studio mederu (default), your own collections, or collab collections.
🤝
Co-Creators
Add co-creators by wallet address or .tez name. Royalty revenue is split among all co-creators based on configurable shares.
🎨
Material Artist Credits
When you used material presets while creating, those artists are automatically credited and share 8% of each sale (split evenly among all material artists used).
🎁
MDRU Reward
Every successful mint earns $MDRU — the mederu participation token. Reward amount halves quarterly — see mederu.art/royalties for the current schedule.
📎
Supported Formats & Size
🖼 Image (JPG, PNG, WebP, GIF) — max 50 MB
🎞 Animation (GIF) — max 50 MB
🎬 Video (MP4) — max 100 MB
🏷️
Trait Editor
🆕 Customize NFT metadata attributes (traits) directly in POST mode. Material-based attributions (artist wallet, material ID) are auto-populated. Add custom key:value traits for rarity, edition info, or any metadata you want on-chain. All traits merge into TZIP-21 attributes at mint time.
📤
DRAW → POST Flow
🆕 Press 📤 POST in DRAW mode to capture your canvas and jump directly to POST. The image, attributions, and metadata transfer seamlessly — no separate MINT step needed.
💡 TIPS
💡 Use descriptive tags — they help collectors discover your work.
💡 Set royalties to 10% as a standard starting point.
💡 For 1/1 works, set editions to 1 and a meaningful price.
📁
COLLECTIONS
▼Create and manage your on-chain galleries
🎫 Artist Pass required
➕
Create Collection
Click [ New Collection ] in the Atelier. Set a name, description, and thumbnail. A new FA2 smart contract is deployed on Tezos — your own on-chain gallery.
🤝
Invite Collaborators
Add collaborators by wallet address during collection creation. They receive an on-chain invitation to accept and join.
🔄
Select Collection
In POST mode, choose your target collection from the dropdown. All mints go directly into that collection's contract.
🌐
Objkt Integration
Collections appear on objkt.com automatically. Artist attribution, name, and description are pulled from the on-chain metadata.
🧰
TOOLKIT
▼Free Mint / Send / Fans — profile management panel
🎫 Artist Pass required
🎁
Free Mint Pages
Create custom free mint landing pages for your community. Select tokens from your collection, set a title, choose from 17 Google Fonts (Monoton, Orbitron, Rock Salt, Permanent Marker, and more), customize title color, stroke/outline color, background color/image (tiled repeat), layout alignment (Center/Left/Right), and NFT display size.
🔗
Slug-Based URLs
Each free mint page generates a human-readable URL from the title. Example: "Summer Drop" → /free-mint/summer-drop. URLs are permanent and shareable.
🖼
Background Image Upload
Upload a background image that tiles seamlessly across the page. Uploaded via IPFS for permanent storage. The image repeats in both directions to fill any browser size.
✏️
Text Stroke / Outline
Add a colored stroke/outline around title text using -webkit-text-stroke. Choose any color via color picker. Creates depth and readability on complex backgrounds.
👤
Artist Profile
Add your display name and social link (X handle or URL). These appear on the public free mint page, building your brand and making it easy for collectors to follow you.
📤
Share Buttons
Each public free mint page includes Copy Link and Share on X buttons. Creators also see an Edit button (bottom-right) for quick access back to the toolkit.
📝
Inline Editing
Click EDIT on any existing free mint page from the toolkit to modify it. Change title, fonts, colors, tokens — all changes are saved instantly to Redis.
📦
Send Tab
Transfer NFTs to other wallets. Select tokens from your collection, enter a destination address (tz… or .tez domain), and execute an FA2 batch transfer on-chain.
👥
Fans Tab
View analytics on who holds your artwork. See unique wallet addresses that own tokens from your collections, with counts per holder.
💡 TIPS
💡 Set a catchy title for your Free Mint page — it becomes your URL slug!
💡 Upload a pattern or texture as background image for a branded feel.
💡 Add your X handle in the Social Link field so collectors can find you.
💡 Use the Fans tab to identify your top collectors for targeted drops.
🏪
ARTIST SHOP
▼Direct-to-collector physical & digital goods marketplace
🎫 Artist Pass required
The Artist Shop enables creators to sell physical goods (prints, originals, merchandise) and digital items directly to collectors. Each artist has their own shop tab on their profile page. Items can optionally be minted as NFTs on the mederu Shop collection for on-chain provenance.
🏷️
Item Categories
5 categories for organizing your shop:
• 🖨️ PRINT — giclée prints, posters
• 🎨 ORIGINAL — one-of-a-kind original artworks
• 🛍️ GOODS — stickers, pins, merchandise
• ✏️ COMMISSION — custom commission slots
• 📦 OTHER — any other items
📸
Image Upload
Upload up to 5 product images per item. Images are stored on IPFS via Pinata for permanent, decentralized hosting. Supports JPG, PNG, and WebP.
💰
Flexible Pricing
Set prices in any currency (¥, $, €, XTZ, etc.) as free text. For NFT-minted items, set an XTZ price for automatic Objkt marketplace listing.
🔗
NFT Mint & List
Optionally mint shop items as NFTs on the mederu Shop FA2 collection. Set editions and XTZ price — items are automatically listed on Objkt marketplace after minting. NFT badge (🔗 NFT) appears on listed items.
📦
Order Management
Full order workflow: Request → Invoice → Approve → Pay → Ship → Deliver. Artists receive purchase requests with encrypted shipping addresses. Send invoices with itemized pricing and shipping costs.
🌍
International Shipping
Configure shipping rates by region. Set your ships-from country. Buyers see calculated shipping costs at checkout based on their destination.
💳
Payment Methods
Accept payments via:
• ꜩ XTZ — on-chain Tezos transfer
• 💳 Stripe — credit/debit card
• 📝 Manual — custom payment arrangement
🔒
Encrypted Shipping
Buyer shipping addresses are encrypted with AES-256-GCM. Only the seller can decrypt the address using wallet signature authentication.
👤
Wallet Authentication
All shop actions (create, edit, delete, purchase) require wallet signature verification. No passwords needed — your Tezos wallet IS your identity.
💡 TIPS
💡 Add high-quality product photos — they appear as the first thing collectors see.
💡 Use the COMMISSION category to offer custom artwork slots.
💡 Mint items as NFTs for on-chain provenance and automatic Objkt listing.
💡 Set up shipping rates for your most common destinations to streamline orders.
💡 Your shop is accessible from your profile page — share your profile URL with collectors.
mederu — 愛でる。創る。集める。